External writings:
In the first part Only the internal font was used with 5x7 points. With high -resolution displays, the font is then too small. But there is also the possibility to use an external font. In the fonts fonts of the Adafruit GFX-Library There are a number of different fonts that only support the first 127 characters and therefore have no German umlauts. With the program GFX tool You can expand these fonts, or create a new font from a font that is installed on your computer at the push of a button and save it as an include file in the required format. The program is a installation package for Windows 32-bit or 64-bit available for free download. A operating instructions are available on the associated Wiki side. This program is also used later in this article to adapt pictures.
The Font Include file consists of two arrays and a structure that summarizes all the necessary information. The data is stored in the program memory. An array contains the pixel patterns for the individual characters. For each letter, the other array contains its dimensions and a pointer to the pixel pattern for the letter. The structure usually has the same name as the include file.
Functions
In addition to the functions known from Part 1, there are other functions that affect the text edition.
With the function
Void Setfont (Const GFXFONT *f = zero);
an external font is set. If the parameter f = zero is used, the internal font is used.
Since external writings often also have different widths for their signs, it is important to know how many pixels a certain text is high and wide for formatting. The function
VOID Gettextbounds (Const Char *String, Int16_t X, Int16_t Y, Int16_t *X1, int16_T *y1, uint16_t *w, uint16_t *h);
For C-strings or
void Gettextbounds (Const String & Str, Int16_t X, int16_t y, int16_t *x1, int16_t *y1, uint16_t *w, uint16_t *h);
For Arduino Strings, the rectangle provides exactly surrounding the text.

Cursor position X and Y indicates the starting point of the text on the baseline (green). In contrast to the internal font, in which the cursor position corresponds to the left upper corner.
With the function
void Setextbound (int16_t x, int16_t y, int16_t w, int16_t h);
a rectangle can be defined in which text editions are possible. Text outside of this rectangle is not shown.
Useful auxiliary functions
The character set of writings created with the GFX tool corresponds to the Windows Codepage 1250. Since the Arduino IDE UTF8 uses as a character set, conversion is necessary to correctly present special characters.
String utf8towindows (string s) {
String res = ""; // String for results
uint8_t PREV = 0; // to remember previous character
uint8_t c; // Current character
for (uint16_t i = 0; i
if (c <0x80) {
res += char (c); // Less then 0x80 -> Standard Ascii
} Else {
Switch (Prev) {
Case 0xc2: res += char (c); Break;
Case 0xc3: res += char (C | 0x40); Break;
// if prvious character code was 0xc3, we need to set bit 7
Case 0x82: if (c == 0xac) res += char (0x80); Break;
// Special handling for Euro Character
} // other utf8 characters wants to be ignored
}
PREV = C; // Remember Currend Character for Next Loop
}
Return res;
}
Signs smaller than 128 can be taken over directly. Other characters are coded in UTF8 with two characters. The first character defines a group of 64 characters with the code 0x80 - 0xbf. The groups 0xc2 and 0xc3 represent characters that are also defined in the 1250 code. The first group 0xC2 can be taken over directly 0x80 to 0xbf. In the second group 0xC3, the two highest quality bits must be set, i.e. 0xc0 to 0xff instead of 0x80 to 0xbf. A special case is the euro sign coded in UTF8 with three characters, 0xe2, 0x82 and 0xac. In the Codepage 1250, the euro sign is coded with 0x80.
Another practical function can be used to place a text within a box. A orientation can be carried out horizontally and vertically.
VOID TextintheBox (String Txt, Int16_t X, Int16_t Y, Uint16_t Width, uint16_t Height, uint8_t hor, uint8_t vert)
Int16_t X1, Y1, UL, OL, XC, YC, BL;
uint16_t w, h;
TFT-> GetteextBounds (TXT, 0.0, & X1, & Y1, & W, & H);
// we get the text dimensions if printing at x = 0 and y = 0
Ol = y1 * -1; // The Ascender Equates Direct to Y1 * -1
Ul = H-OL; // The Descender Equates to the Hight - Ascender
TFT-> Setteextbound (X, Y, Width, Height);
// This call sets clipping to the size of the box
TFT-> SetteextWrap (false); // We Dont Want Text Wrapping
XC = x; // For Left Aligned Start Position = X
Switch (Hor) {
Case 1: XC = (X + Width/2 - W/2); Break;
// For centered starting position is half text width before box center
Case 2: XC = (X + Width - W); Break;
// For right start position is text width before box end
}
YC = y + OL;
// for top align start position is ascender height below the box
Switch (vert) {
Case 1: YC = Y + Height/2 + OL/2; Break;
// For middle startpos is half ascender height below Middle of the box
Case 2: YC = Y +Height -Ul; Break;
// For Bottom Startpos is descender height hiher then Bottom of the Box
}
TFT-> Setcursor (XC, YC); // set cursor on start position
tft-> print (txt); // Print the text
}
In this function, the two functions presented above are Setextbound and Getteextbounds used to place the text. As a parameter, the text and the position and size of the box are required. The horizontal alignment on the left = 0, centered = 1 or right = 2 and a vertical alignment above = 0, in the middle = 1 or below = selected.
First, the width and height of the text is determined. The upper lengths are obtained directly from the y position of the rectangle, since the text is adopted on position 0. For centering, the starting point is placed on half the text length in front of the middle of the box. The same is vertical, although for optical reasons not taking into account.

Pictures:
Images are defined as a episode of pixels. There are three formats 1-bit per pixth point, 8-bit per pixel and 16-bit per pixel. Since images require a lot of storage space, they are preferably saved in the program memory.
1-bit per pixel:
This format needs the lowest storage space. Pictures are two -colored. Depending on whether the bit is set for a pixel or not, one or the other color is used. The bits are processed from the top right to the bottom right. A new scene always starts with a new Parte. This format needs the lowest storage space. Pictures are two -colored. Depending on whether the bit is set for a pixel or not, one or the other color is used. The bits are processed from the top right to the bottom right. A new scene always starts with a new Parte is filled with 0.

You need (wide + 7) / 8 Partes per You need (wide + 7) / 8 Partes
The example would look like this as a C code:
Const Uint8_t Progmem Smiley [26] =
{0x07, 0x00,
0x18, 0xc0,
0x20, 0x20,
0x90,
0x90,
0x80, 0x08,
0x80, 0x08,
0x90, 0x48,
0x48, 0x90,
0x47, 0x10,
0x20, 0x20,
0x18, 0xc0,
0x07, 0x00};
With the function
void drawbitmap (int16_t x, int16_t y, const8_t bitmap [], int16_t w, int16_t h, uint16_t color, uint16_t bg);
Will the picture bitmap With the width W and the height H in the position X, y output. All pixels with value 1 get the color color, everyone else the color BG. Will the parameter BG left out, pixels are not spent with the value 0, the background remains.
8-bit per pixel:
This format needs one Parte per pixel. The value determines the brightness of the pixel. 0 = black, 255 = white. The values in between give corresponding shades of gray.
The function
void drawgrayscalebitmap (int16_t x, int16_t y, Const uint8_t bitmap [], int16_t w, int16_t h);
gives the picture bitmap With the width W and the height H in the position X, y in shades of gray.

With a little of its own programming, the image can also be output as a gradation of any color instead of gray tones. Here is the function:
Void Drawmonochromebitmap (int16_t x, int16_t y, const8_t bitmap [],
int16_t w, int16_t h, uint16_t color)
{
float v; // to hold the Brightness of a Pixel as a floating point number
uint16_t r, g, b; // to hold the required color as red, green and blue value
b = (color << 3) & 0xf8; // Split the color in 565 Formatt Blue
G = (Color >> 3) & 0xFC; // green and
r = (color >> 8) & 0xf8; // red
TFT-> Startwrite (); // Start a spi write stream
for (int16_t j = 0; j <h; j ++, y ++) // iterate over rows
{
for (int16_t i = 0; i <w; i ++) // iterate over columns
{
V = 1.0 * PGM_Read_Parte (& Bitmap [J * W + I]) /255;
// Get the Brightness of the Pixel from Image Data And
// Set the pixel on Affichage using red, green and blue weighted Par the
// Brightness of Image Pixel
TFT-> WRITEPIXEL (X + I, Y, TFT-> Color565 (V * R, V * G, V * B));
}
}
TFT-> Endwrite (); // stop the spi write stream
}
The color is first broken down into their components blue, green and red. The brightness values of the pixels from the program memory are read in two nested loops for lines and columns. The division Par 255 is formed between 0.0 and 1.0. Multiplication with 1.0 is important. This ensures that the following arithmetic operations are carried out with floatingommaarithm. The color of the pixel is then composed of the weighted color parts.
16-bit per pixel:
This format requires two Partes per pixel. The value determines the color of the pixel in 565 format.
The function
void draw16bitrgbbitmap (int16_t x, int16_t y, const uint16_t bitmap [], int16_t w, int16_t h);
gives the picture bitmap With the width W and the height H in the position X, y out of.

For the 16-bit format there is also a second function in which an additional 1-bit mask bitmap controls whether a pixel is output or not. Both bitmaps must have the same width and height.
The functionVOID Draw16Bitrgbitmapwithmask (int16_t x, int16_t y, uint16_t *bitmap, uint8_t *mask, int16_t w, int16_t h);
gives the picture bitmap position X and y With the width W and the height H out of. The mask becomes mask taken into account. Only pixels of which are set in the mask are displayed.

Background image:
If you use a background image, the background image must first be issued before making changes in the foreground. This can lead to flickering with large background images. One solution for this is to revive only that part of the background image that is affected Par the change. The following function does exactly that.
VOID Draw16BiTrGBitmapclipping (Int16_t X, Int16_t Y, Const Uint16_t Bitmap [], Int16_t W, Int16_T WB, Int16_t XB, Int16_t Yb)
{
TFT-> Startwrite (); // Start a spi write stream
for (int16_t j = 0; j <h; j ++) // iterate over rows
{
for (int16_t i = 0; i <w; i ++) // iterate over columns
{
// Set Target Pixel with Color From Pixel Within Image Part
TFT-> WRITEPIXEL (X + XB + I, Y + YB + J, Bitmap [(Y + J) * WB + X + I]);
}
}
TFT-> Endwrite (); // stop a spi write stream
}
The parameters X and y Determine the position and the parameters W and H The size of the partial image to be output. The parameter bitmap points to the entire background image with the width WB. With XB and yb the position is taken into account at which the background image was output. Most of the time that is 0.0.
The link refers to a video that shows a bee that flies back and forth with flowers in front of a background image. The implementation was carried out with the above function. It is also included in the sample program for this post. Link to the video.
Example program:
The sample program was for that 240 x 280 display with ST7789 controller Created, but, as in Part 1 was shown, simply changed for other displays.
The sample program is controlled via the serial monitor. The following commands are possible:
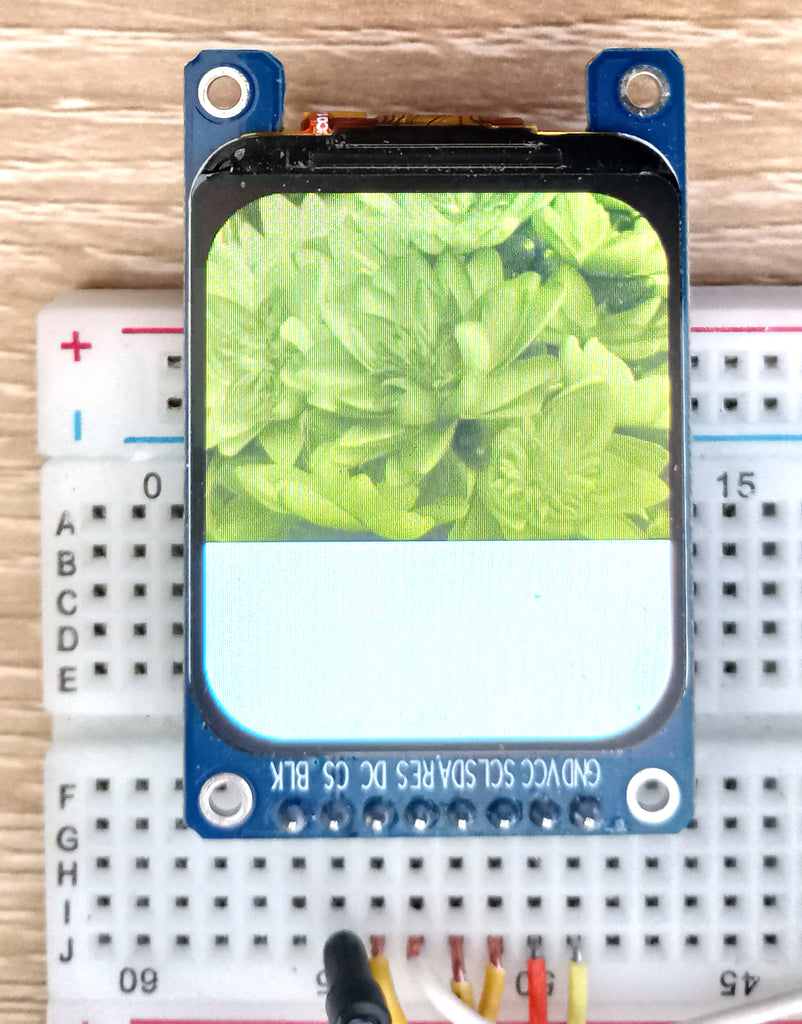
A A flower picture is shown as a 1-bit graphic in yellow with a blue background.
B The same flower image is shown as a 8-bit graphic with grayscale.
c The same flower picture is shown as 8-bit graphic with tinting from yellow.
D The same flower image is colored as a 16-bit graphic.
e The same flower picture is represented masked with the letters "AZ".
F in the foreground of the flower image a small bee moves.
If the command begins with a digit, the output of text can be tested in a box. The first digit determines the horizontal alignment (0 = left, 1 = middle, 2 = right).
The second digit determines the vertical alignment (0 = above, 1 = in the middle, 2 = below).
All subsequent characters are converted from UTF8 to Codepage 1250 and displayed in the box according to the specified orientation.
The ZIP file The sample program should be expanded to the Arduino sketch directory, it contains the following files:
GFX-Part2_test.ino Sketch with the sample program.
1-helper.ino auxiliary functions described in this article.
BUNTE_SEEROSES_KLEIN_1BIT.H Image with water lilies 240 x 180 in 1-bit/pixel format.
BUNTE_SEEROSES_KLEIN_8BIT.H Image with water lilies 240 x 180 in 8-bit/pixel format.
BUNTE_SEEROSES_KLEIN_16BIT.H Image with water lilies 240 x 180 in the 16-bit/pixel format.
mask.h mask with the signs "AZ" 240 x 180 in 1-bit/pixel format.
Biene_color.H Image with bee 64 x 44 in the 16-bit/pixel format.
Biene_maske.H Mask with bee 64 x 44 in a 1-bit/pixel format.
Arial_rounded.h writing with a height of 22pt.
The pictures and the writing were used with the program GFX tool created.
Have fun experimenting with writings and pictures.


2 commentaires
Bernd-Steffen
Hallo Jürgen, ich bin an der XCL-Tabelle interessiert. mailto:berndsteffen@gmx.de Viele Grüße Bernd-Steffen
Jürgen
Hallo.
Ich habe mir eine Excel-Tabelle entworfen mit der man sich eigene Zeichen entwerfen kann.
Wer daran interessiert ist kann sich gerne an mich wenden. Ich sende ihm dann gerne diese Excel-Tabelle zu.