After a year of experience with the Toniebox I can understand why the small figures with whom you can hear music or fairy tales are so popular. Our 1 1/2 -year -old granddaughter got on straight away and quickly selected her favorite figure with the children's songs. In the meantime, she has a stately collection of characters, because both grandparents do not live on site and don't just want to bring Naschies with her visits.
It is also cheaper, as our customer and cooperation partner Thorsten Voss showed. With parts from our range and a steadily developed sketch, it created a nice alternative that is not only suitable for the children's room, but also for a kindergarten with many children. AZ-Delivery took this as an opportunity to sell the hardware used as a bundle. That Tonuino set consists of MP3 Player, Nano V3.0, RFID KIT and 10 x 13.56 MHz RFID cards. And Mr. Voss now offers Finished boards and has one Website for the community.
After I had already tried the RFID kit with the Raspberry Pi for the "Access control" project, I wanted to program an inexpensive solution for the music player myself with one of my many old Raspis. Due to the lot of occupation with Arduino sketches, my knowledge of Python otherwise rusted. But I not only revived my skills, but also gained new knowledge. Do you have interest? Then learn more about the connection of the RFID card reader to the Raspi, reading and describing the maps or chips, playing songs or entire playlists, and of course also the autostart of the program, around the Raspi "Headless", so Without the keyboard and monitor, to operate and drive down.
What do we need?
|
1 |
Any Raspberry Pi, prefers Raspi with WiFi and Bluetooth |
|
1 |
|
|
1 |
|
|
Opt. |
Bluetooth speaker |
|
Opt. |
1 button to switch off |
The nice thing about Raspberry Pi is that he basically has everything for our project. The music can be saved on the micro SD card and the interface for the RFID card reader only has to be activated. What are we waiting for?
Libraries and circuit diagram
On the product page for that Rfid kit rc522 we find under Important downloads & linkseither Raspberry Pi Libraries as well as Raspberry Pi Schematics..
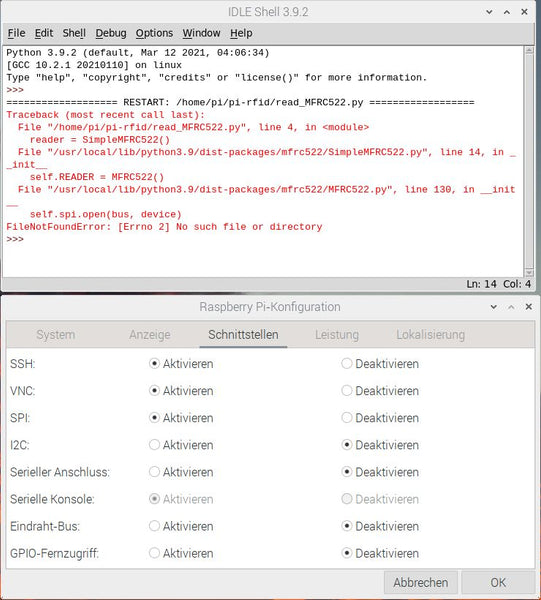
The circuit diagram quickly shows that the RFID-Card Reader is connected to the SPI interface that we have to activate in the configuration:

In the upper part of the next picture you can see the error message when the SPI interface (English. Serial Peripheral Interface) has not yet been activated.

There are various program libraries (Python modules) for querying the RFID card. With the Pi-RC522 module used on the product page and in the eBook, I initially had problems recognizing the cards. This was because I had not connected the IRQ PIN. Corresponding information and a new circuit diagram are now supplemented.
During my research on the Internet, I have the Pimylife library at GithubUp found that can do without IRQ. This worked out what I had planned.
Here are the links for everyone who wants to know more.
https://github.com/pimylifeup/MFRC522-python The program library
https://pimylifeup.com/raspberry-pi-rfid-rc522/ Pimylifeup's blog
For this project we install the library with PIP3 directly onto the Raspi. Anyone who uses a current Raspberry Pi Os (formerly Raspbian) has already installed the necessary programs PIP3 and Spidev. We only need to install the Pimylifeup library. This happens in the terminal with:
sudo PIP3 Install MFRC522
We are all spoiled by the libraries in Arduino IDE, because sample programs are always included here that can be adapted for your own needs. At Pimylifeup, program fragments for reading and describing the RFID tags are shown in the above blog, which I have "pimped" here for my purposes. Here is my sketch for reading and possible describing the RFID tags (Download readwrite_mfrc522.py). At the beginning there are indications of the prerequisites and for circuit.
Program code
After importing the library, the Reader object is initially instantiated and then the methods read () or write () are applied to it. I have integrated them into the self -defined functions read () and write (). The ID and the text are read and output in the main program; Then ask whether a new text (Newdata) - e.g. the file name of our music files - should be entered. For the sake of simplicity, I did not use a loop for repeated reading and writing several RFID Tags.
 # Demo Program for RFID Reader RC522
 # Based on Library/Python modules and Examples by Pimylifeup
 # Preparations:
 # Open Raspberry Pi Configuration and Activate Spi
 # Connect RFID Reader to Raspberry Pi - Physical Pin Numbers
 # Sda - pin 24 sck - pin 23 mosi - pin 19
 # MISO - PIN 21 IRQ - Not Connected
 # GND - PIN 25 RST - PIN 22 3.3V - PIN 17
 #
 # If you have a current OS, PIP3 and Spidev Are Included
 # Install Library/Python modules with
 # Sudo PIP3 Install MFRC522
 #
 # by Bernd Albrecht for Az-Delivery Dec 2021

 #!/USR/BIN/ENV PYTHON3
 import RPI.GPIO AS GPIO
 from mfrc522 import Simplemfrc522
 reader = Simplemfrc522()

 def Read():
     print("Hold RFID Card/Chip Close to Reader!")
     ID, text = reader.read()
     print("Id =",ID)
     print("Text =",text)

 def Write(Newdata):
     print("Hold RFID Card/Chip Close to Reader!")
     reader.write(Newdata)
     Read()

 # Main Program:
 Read()
 deposit = input("Do you want to write text to rfid card/chip? Y/n")
 IF deposit=="Y" or deposit=="Y" or deposit=="Z" or deposit=="Z" or deposit=="J" or deposit=="J":
     Newdata = input("Insert New Data for RFID Tag!")
     Write(Newdata)
     GPIO.cleanup()
 Else:
     GPIO.cleanup()
I use this sketch to prepare RFID cards for my Music Player. I simply write the file name of the piece of music from the subfolder / music / on the map or the chip. Please do not use spaces or "exotic" characters; The English ABC, numbers and the underlines work perfectly.
Example: EdSheeran_Perfect.mp3
But it also works: playlist.xspf For a playlist created with VLC.
With the RFID cards described in this way, I try my Python program Musicplayer_mfrc522.py out. Compared to the first program, there are two new program modules that are rarely used.
The module OS is needed to use the VLC program to play the music (OS.System ('CVLC/Home/Pi/Music/'+Song)) and driven down the Raspberry Pi (OS.System (´Sudo Shutdown - H now´)). With the program CVLC If the graphic surface of VLC is dispensed with and thus saved time.
The module _thread It is needed to continue to be able to query RFID cards while playing the music and thus play the next song or - in connection with the button between pins 39 and 40 - to end the program.
So to end the program and drive down the Raspberry Pi, firstly the physical pins 39 (ground) and 40 have to be kept on the reader.
 #!/USR/BIN/ENV PYTHON3
 import OS
 import RPI.GPIO AS GPIO
 from time import sleep
 from mfrc522 import Simplemfrc522
 import _thread

 reader = Simplemfrc522()
 GPIO.setwarning(False)
 GPIO.set up(40,GPIO.IN,Pull_up_Down=GPIO.Pud_up)

 def play():
     global ID, song
     OS.system('CVLC/Home/Pi/Music/'+song)

 ## DEF READ ():
 ## global id, song
 ## Print ("Hold Rfid Card/Chip Close to Reader!")
 ## ID, Song = Reader.Read ()
 ## print ("id =", id)
 ## Print ("Text =", Song)

 while GPIO.input(40)==True:
     print("Hold RFID Card/Chip Close to Reader!")
     ID, song = reader.read()
     print(ID)
     print(song)

     _thread.Start_new_thread(play,())
     print("Music is playing ...")
     while reader.read()[1]==song:
         sleep(1)
     print("Music Stoped Playing.")
     OS.system('Killall VLC')

 GPIO.cleanup()
 OS.system('Sudo Shutdown -H now')
Audio output
There are various options for the output of the music: mostly the output is over HDMI, i.e. the TV or the monitor with built-in speakers. If you have a Bluetooth speaker, this option is recommended. The worst option is the built-in 3.5mm jack socket. If you want to use headphones or speakers with jack plugs, you should treat yourself to an inexpensive USB sound module. It is switched between the options with a right mouse click on the loudspeaker symbol.
Autostart
If all settings are made, the Raspi "Headless" can be operated. Safe ending the program and shutdown of the Raspberry Pi are part of the music player, the autostart is still missing. Various options are described for this:
The first method with the file /etc/rc.local Were not working for me (more?). Maybe a side effect of the new Raspberry Pi OS "Bullseye"?
The second method with that in the directory /Home/Pi hidden file .bashrc works great: the file with
sudo nano /home/pi/.bashrc
Open and enter the following two lines (if necessary with their changes):
 echo Running at boot
 python3 /home/pi/pi-rfid/musicplayer_mfrc522.py &

For me, I have created complete playlists for the most important events, e.g. romantic dinner in pairs, or listening classical when there is nothing to be found on 100 channels on TV. Incidentally, the RFID cards can also be glued wonderfully, so that everyone can handle it from the toddler to the old man. Have fun recovery.


3 comments
Ulli Sundermann
Hallo, ich habe 2 solcher Projekte mit euren Komponenten realisiert, bei mir fanden jedoch der Arduino Nano und ein ESP 32 bisher Verwendung, da sie sofort betriebsbereit sind und nicht erst booten müssen. Der Beitrag hat mich aber noch einmal inspiriert den Pi mit einem Sonos System zu koppeln, im Netzwerk laufen zu lassen und die RFID Karten dann über ein ESp ebenfalls im Netzwerk eingeloggt als Handgerät dann an den Pi zu übertragen und die hinterlegte Playlist abzuspielen. Vielen Dank für die Inspiration.
Gruß aus NRW
Andreas Wolter
@Helmut Hoppe: eine “serienreife” Variante können wir nicht anbieten. Die Blogbeiträge dienen lediglich als Inspiration für eigene Projekte. Im Beitrag ist das TonUINO Kit verlinkt. Vielleicht ist das etwas für Sie.
Grüße,
Andreas Wolter
AZ-Delivery Blog
Helmut Hoppe
Hallo, ich finde das Projekt sehr spannend. Leider habe ich nicht die Zeit und auch nicht die tieferen Kenntnisse um diese Projekt für meine Anwendung Serienreif zu gestalten. Aus diesem Grund die Frage: gibt es eine Endnutzer taugliche Version die “einfach” in ein Gehäuse eingebaut werden kann und per wenige Handgriffe genutzt werden kann. Es sollen eine begrenzte Anzahl von Liedern (MP3) von einer SD-Karte abgespielt werden können. Per Podi oder Taster etwas lauter/leiser gestellt werden können und das Abspielen sollte ein/aus (start/stopp) schaltbar sein.
Ein userseitiges downloaden der MP3s wäre super.
Ich such ein Komplettpaket zum integrieren in meine Geräte. Viele Grüße Helmut Hoppe